Views: 0 Author: Wondee Autoparts Publish Time: 2022-03-31 Origin: Wondee Autoparts


Production Process Guidance of Leaf Springs
-Punching holes for fixing bumper spacers (Part 4)
1. Definition:
Using punching equipment and tooling fixtures to punch holes at the designated positions for fixing anti-squeak pads / bumper spacers at both ends of the spring steel flat bar. Generally, there are two kinds of punching processes: cold punching and hot punching.
2. Application:
Some leaves with eye wrapping and other leaves.
3. Operating procedures:
3.1. Inspection before punching
Before punching the holes, check the inspection qualification mark of the previous process of spring flat bars, which must be qualified. At the same time, check the specifications of spring flat bars, only they meet the process requirements, the punching process can be allowed to start.
3.2. Adjust positioning tooling
As shown in Figure 1 below, punch elliptical holes at the end of spring flat bars. Punching by the center hole positioning, and adjust the positioning tooling according to the dimensions of L ', B, a and b.


(Figure 1. Positioning diagram of punching an end elliptical hole)
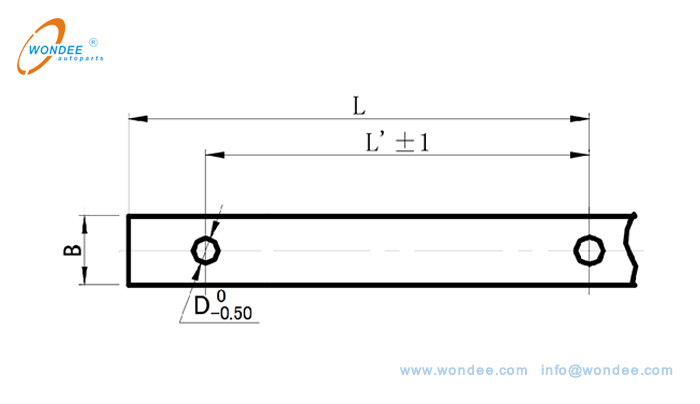
As shown in Figure 2 below, punch circular holes at the end of spring flat bars. Punching by the center hole positioning, and adjust the positioning tooling according to the dimensions of L 'and B.


(Figure 2. Positioning diagram of punching an end circular hole)
3.3. Selection of cold punching, hot punching and drilling
3.3.1 Application of cold punching:
1) If the thickness of spring flat bar t<14mm, and the hole diameter is greater than the thickness t of spring steel flat bar, cold punching is suitable.
2) If the thickness of spring steel flat bar t≤9mm and the hole is a elliptical hole, cold punching is suitable.
3.3.2. Applications of hot punching and drilling:
Hot punching or drilling holes can be used for spring steel flat bar that is not suitable for cold punching holes. During hot punching, the heating temperature shall be controlled at 750 ~ 850 ℃, and the steel flat bar is dark red.
3.4. Punching detection
When punching a hole, first piece of spring steel flat bar must be inspected firstly. Only it pass the first inspection, the mass production can be carried on. During the operation, special attention should be paid to prevent the positioning die from loosening and shifting, otherwise the positioning sizes will exceed the tolerance range, resulting in unqualified products in batches.
3.5. Material Management
The punched(drilled) spring steel flat bars shall be stacked neatly. It is forbidden to place them at will, resulting in surface bruises. The inspection qualification marks shall be made and the work transfer cards shall be pasted.
4. Inspection standards:
Measure holes according to Figure 1 and Figure 2. The hole punching and drilling inspection standards are as shown in table 1 below.
Inspection Items | Length Direction Deviation | Width Direction Deviation | Hole Diameter | Punching Burr | Punching Surface Quality | |
Technical Requirements | L1±1 | ︱a-b︱≤0.75 | ccording to the process card Requirements | ≤0.3 | There is no crack at the punching edge and no overheating and overburning on the hot punching surface | |
Measuring and inspection tools | Name | Tape measure | Vernier Caliper | Vernier Caliper | Vernier Caliper | Visual inspection |
Accuracy | 1mm | 0.02mm | 0.02mm | 0.02mm | ||
Sampling method | Each batch shall be inspected according to the first piece, middle pieces and last piece inspection, and the visual inspection rate of punching surface quality is 100%. | |||||
Compiled by WONDEE Autoparts
2022-3-31
What Are The Most Common Semi-Trailer Parts And Their Functions?
How To Hook Up A Trailer To A Truck: A Foolproof Step-by-Step Guide
Tanker Truck Sizes: A Complete Guide (2025) – Dimensions, Types & Expert Tips
Understanding Semi-Trailer Dimensions for Efficient Equipment Transport
Differences Between Lowboy and RGN Trailers: Choosing the Right Trailer for Your Haul
Understanding Full Trailers Vs. Semi-Trailers for Car Hauling